

Installing Nix on macOS#
I recently got a new computer, and with it came that familiar mix of excitement and frustration when setting it up from scratch (every true nerd has enjoyed this process at least once). I already have a bunch of scripts that make my initial setup easier, but lately I’ve been reading about and experimenting with Nix, and I thought: this might be the perfect opportunity to use it! But first… what exactly is Nix?
The project’s page on GitHub describes it as:
Nix is a powerful package manager for Linux and other Unix systems that makes package management reliable and reproducible.
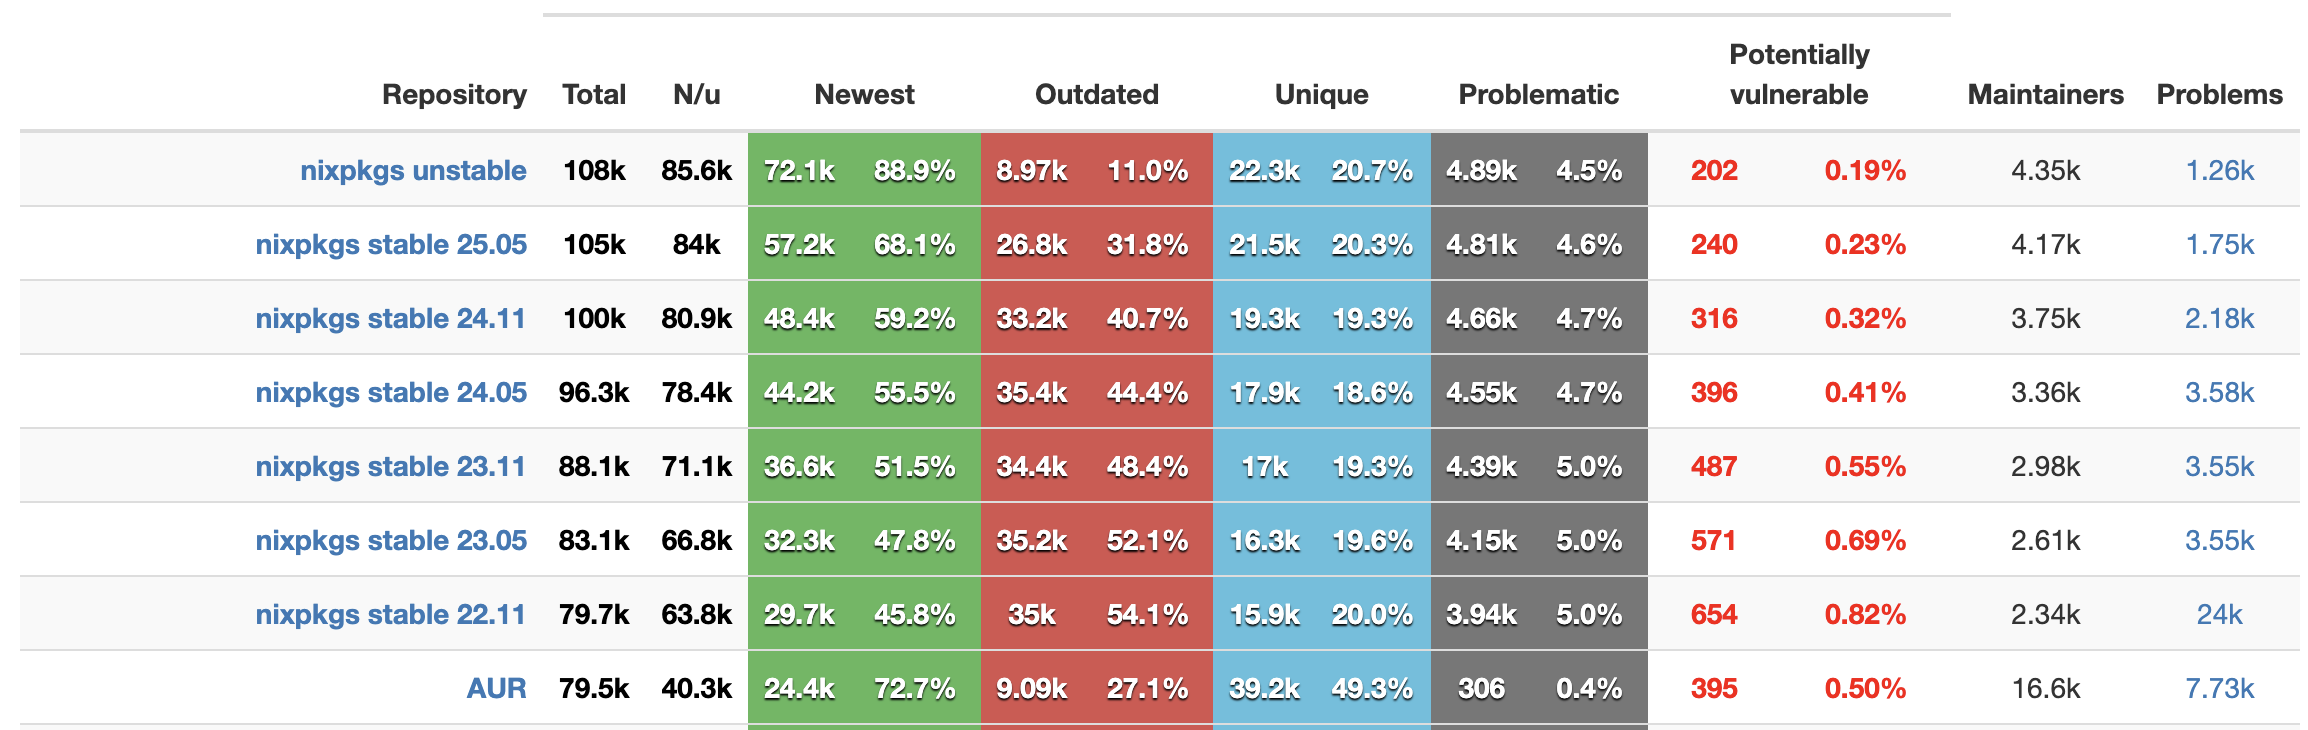
With the Nix language, we can declaratively define which packages we want installed on our system. Not only that — by using Nix as our package manager, we also gain access to the nixpkgs repository, which, at the moment, is the largest and most up-to-date package repository available (as seen on Repology):
Being able to declaratively specify which packages should be installed on our system is already amazing and makes setting up a new machine much easier. However, my scripts don’t just install packages — they also configure my system. Fortunately, Nix can handle that too. In fact, there’s a full Linux distribution built around this concept: NixOS.
I recently started experimenting with NixOS in my homelab, with the goal of having simple and reproducible VM setups. NixOS configurations can be defined entirely declaratively using Nix, but on macOS, this support isn’t available by default. That’s where another fantastic project comes in: nix-darwin.
The project’s page on GitHub describes it as:
This project aims to bring the convenience of a declarative system approach to macOS. nix-darwin is built up around Nixpkgs, quite similar to NixOS.
Now that we’ve introduced the tools we’ll use, let’s go over the steps I followed to install Nix on macOS and create an initial configuration.
Installing Nix on macOS#
Installing Nix on macOS is quite straightforward, basically you need to run the following command in your terminal:
curl -L https://nixos.org/nix/install | sh
This command downloads and executes the Nix installation script. The installation is very intuitive and transparent, so you can just follow the steps provided by the script.
⚠️ Note: If, like me, you have FileVault enabled on your Mac, you may run into an issue during the Nix installation, specifically during the bootstrap of the new disk volume used by Nix. Fortunately, the script detects this issue and provides the steps to fix it: basically, reboot the computer and run the installer again.
After the installation completes, to check if everything worked as expected, just open a new terminal window and run the following command:
nix --version
If the command runs successfully and displays a version number, the installation was a success!
Creating an initial configuration with nix-darwin and Flakes#
Now that Nix is installed on our machine, let’s create an initial configuration with nix-darwin support. The simplest way to do this is by using a Nix feature called Flakes. I won’t go too deep into Flakes here, since that’s not the focus of this article, but you can think of it as a Nix feature that helps you lock dependency versions.
Before anything, let’s create a directory where our configuration will live. In my case, I decided to use ~/.config/nix, but feel free to use whatever location you prefer.
mkdir -p ~/.config/nix && cd ~/.config/nix
Inside this new directory, lets initialize our configuration using a template with nix-darwin configured. Here you have the option to create your configuration targetting a specific nixpkgs repository version or the unstable branch. In my configuration, I went with unstable to get the latest package versions.
For nixpkgs 25.05:
nix flake init -t nix-darwin/nix-darwin-25.05 --extra-experimental-features "nix-command flakes"
Or for nixpkgs unstable:
nix flake init -t nix-darwin/master --extra-experimental-features "nix-command flakes"
After that, you’ll have a flake.nix file in your directory. This is your Nix configuration, and it should look something similar to this:
{
  description = "Example nix-darwin system flake";

  inputs = {
    nixpkgs.url = "github:NixOS/nixpkgs/nixpkgs-unstable";
    nix-darwin.url = "github:nix-darwin/nix-darwin/master";
    nix-darwin.inputs.nixpkgs.follows = "nixpkgs";
  };

  outputs = inputs@{ self, nix-darwin, nixpkgs }:
  let
    configuration = { pkgs, ... }: {
      environment.systemPackages =
        [ pkgs.vim
        ];

      nix.settings.experimental-features = "nix-command flakes";

      system.configurationRevision = self.rev or self.dirtyRev or null;
      system.stateVersion = 6;
      nixpkgs.hostPlatform = "aarch64-darwin";
    };
  in
  {
    darwinConfigurations."simple" = nix-darwin.lib.darwinSystem {
      modules = [ configuration ];
    };
  };
}
By default, the nix-darwin configuration name in the template is simple. You can change it to whatever name you prefer, but it’s common to use your machine’s hostname since that’s the default configuration nix-darwin looks for when trying to build and apply.
Something also important to check is the value of nixpkgs.hostPlatform. This value should match the CPU architecture of our machine:
- aarch64-darwin for Macs with Apple Silicon (M1, M2, M3, etc.)
- x86_64-darwin for Macs with Intel processors
Lastly, we just need to make one more change: add our user configuration, specifying the user’s home directory. Right below the line nixpkgs.hostPlatform = "aarch64-darwin";, add:
users.users.<your-username>.home = "/Users/<your-username>";

# For example:
# users.users.lucas.home = "/Users/lucas";
If you’re unsure of your username, run whoami in your terminal.
Now we can build and apply our configuration using darwin-rebuild. Since darwin-rebuild it’s not installed yet, we’ll use nix run which lets us run a package without installing it first. Note that we must use sudo, as nix-darwin manages many macOS settings that require root privileges to be changed.
sudo nix run nix-darwin/master#darwin-rebuild --extra-experimental-features "nix-command flakes" -- --flake ~/.config/nix#<your-config-name> switch
Remember that, if you used your machine’s hostname as the configuration name, you can omit the #<your-config-name> part.
After the first run, you can rebuild and apply the configuration using the command:
sudo darwin-rebuild switch --flake ~/.config/nix#<your-config-name>
That’s it! Your configuration is now applied. At this point, it only installs the vim package on your machine, as shown in:
environment.systemPackages =
  [ pkgs.vim
  ];
But feel free to search on search.nixos.org/packages to find the necessary packages for your usage. In the next article, I plan to dive deeper into integrating Homebrew to allow installing packages not available in nixpkgs. In the meantime, I highly recommend the nix.dev guide for learning more about the Nix language and how it works.